Living in the sprawling concrete jungle of a large, metropolitan city, or even along the perfectly manicured avenues of a quaint suburban town, can leave homeowners longing for the peace and tranquility of the great outdoors.
The sounds of birds chirping and the smell of pine needles often seem like a distant memory in residential areas. However, with proper drainage and efficient landscape design, it is possible to create a beautiful backyard forest oasis to escape the humdrum of city and suburban living. There are a few simple steps to follow to produce the perfect personal backyard forest.
Creating a Backyard Forest
Beautiful expanses of towering trees don’t need to stay relegated to local and national parks. With the right tools and help from a professional landscaping designer, you can easily transform your property into the backyard forest of your dreams. Determine your plot location, pick out plants, trees, and shrubs, then watch as your personal “pocket forest” flourishes before your eyes.
1. Determine the Forest Location
The first step to creating a picturesque pocket forest is choosing a place to put it. It’s a misconception in the gardening world that you need a large plot of land to plant a forest. While multitudes of acreage are desirable, it’s still possible to grow a forest in a smaller area.
Use a tape measure to draw out the plot of your personal forest. Create a map digitally or manually, marking off water features, sloped land, and ideal locations for trees. It might seem intimidating or challenging to foster growth on an incline, but planting trees and other vegetation on sloped land actually offers numerous benefits. When roots take hold in a hillside, it prevents weathering and erosion by wind, rain, and human or animal traffic.
Once you’ve determined the perfect placement for a personal forest on your property, you can begin choosing tree, plant, and shrub species that will flourish in a forest ecosystem in your local climate.
2. Picking Out Plants
When envisioning your backyard forest oasis, you unquestionably imagine tall, hardy trees casting shade across the property. Although trees are an essential component, shrubs, grasses, and other vegetation all work hand in hand to build a robust forest ecosystem. If you’re creating your own backyard forest, mimic nature, and pick out plenty of vegetation types to grow on your plot.
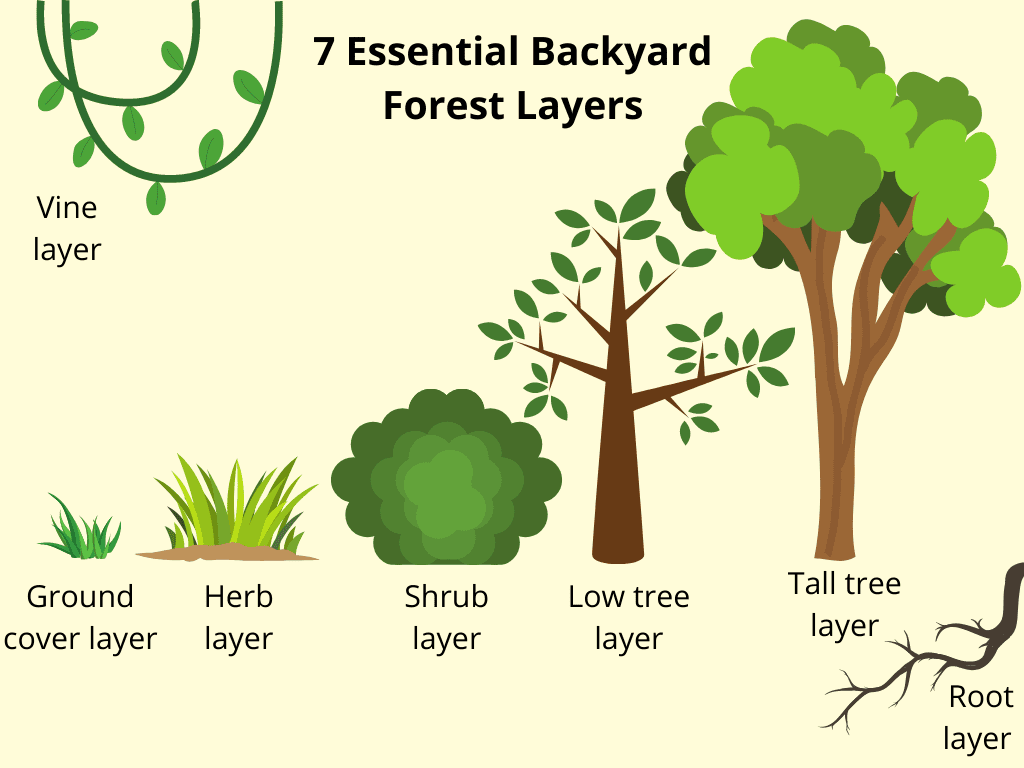
Layer Your Forest
Layers of vegetation are a necessity for lush, vibrant forests. To ensure that your trees continue to grow long into the future, build your forest with these seven essential elements:
When you visit a park preserve or national forest, trees aren’t the only natural feature you see. Trees, shrubs, grasses, vines, and other vegetation work in unison to promote healthy growth throughout the entire ecosystem. Plant a wide variety of vegetation types together to create a beautiful natural landscape.
Know Your Zone
It’s essential to understand what plant hardiness zones are if you want to grow a thriving backyard forest. Certain plants flourish in specific locations, while others might find that habitat entirely unsuitable for growing.
Plant hardiness describes a species’ ability to tolerate adverse conditions such as drought, cold, wind, flooding, and other predations. Plant hardiness zones indicate climate conditions where plants will thrive best. In colder climates like Minnesota and the Midwest, gardeners and landscape designers typically choose hardy trees and plants within zones 4 or 5.
Use the U.S. Department of Agriculture’s handy
interactive plant hardiness zone map
to discover the best tree and vegetation options available for your area. Once you’ve determined the proper species to plant in your personal forest oasis, you can begin planning its design.
3. Designing the Forest Landscape
Now that you’ve decided on the trees and vegetation that will appear in your forest, it’s time to think about the landscape’s design itself. Plants need plenty of space to receive life-sustaining nutrients, sunlight, and water. It’s also crucial that your soil retains moisture while still allowing for adequate drainage.
Drainage and Irrigation
Creating a backyard forest can be a challenging task and significant expense, so contact a professional landscaper for a
quote and to determine whether your forest needs drainage or irrigation systems implemented. Plants need water for continuous growth, but oversaturated soil can cause severe damage to trees. Install adequate drainage to
avoid root rot in your backyard forest and maintain a healthy ecosystem.
Leave Space to Grow
It’s appealing to envision the boughs and branches of a bustling forest enclosing around you as you escape everyday life. However, when first beginning your backyard forest, ensure enough space to allow trees, shrubs, and other vegetation to continue receiving sunlight to grow over time. Your oasis might seem sparse at first, but tree branches will stretch outward and upward after a few years of adequate maintenance until it becomes your shady sanctuary of solitude in the suburbs.
4. Watch Your Forest Flourish
Once you’ve positioned all your plants properly and installed adequate drainage and irrigation systems, you can begin to enjoy your backyard forest. Although it may take a few years for trees to produce significant growth, you can still enjoy nature’s sights and sounds in your wonderful outdoor oasis.
Hopefully, chirping birds, buzzing insects, and other local fauna will soon frequent your property.
Enjoy your beautiful backyard
forest from a porch or patio for an added level of relaxation.
Maintaining Your Backyard Forest Oasis
Now that you’ve achieved the backyard forest oasis of your dreams,
landscape maintenance
is required throughout all seasons to keep it looking lush and lively. Taking care of your forest is hard work, but it’s a labor of love that produces a beautiful result.
To maintain your forest, ensure all drainage and irrigation systems are working each season correctly. Winterize both humanmade and natural elements of your oasis to protect against frigid temperatures and other cold-weather challenges. Take advantage of the lack of leaves and
prune trees in the winter
to see immense new growth during warmer spring months.
Planting, growing, and maintaining a backyard forest oasis isn’t an easy task. Before embarking on this challenging project,
contact a professional landscape designer to pick the proper plants and ensure a healthy, vibrant end result for you to enjoy for years to come.