How to Implement Waterfall Features Into Your Backyard Pond

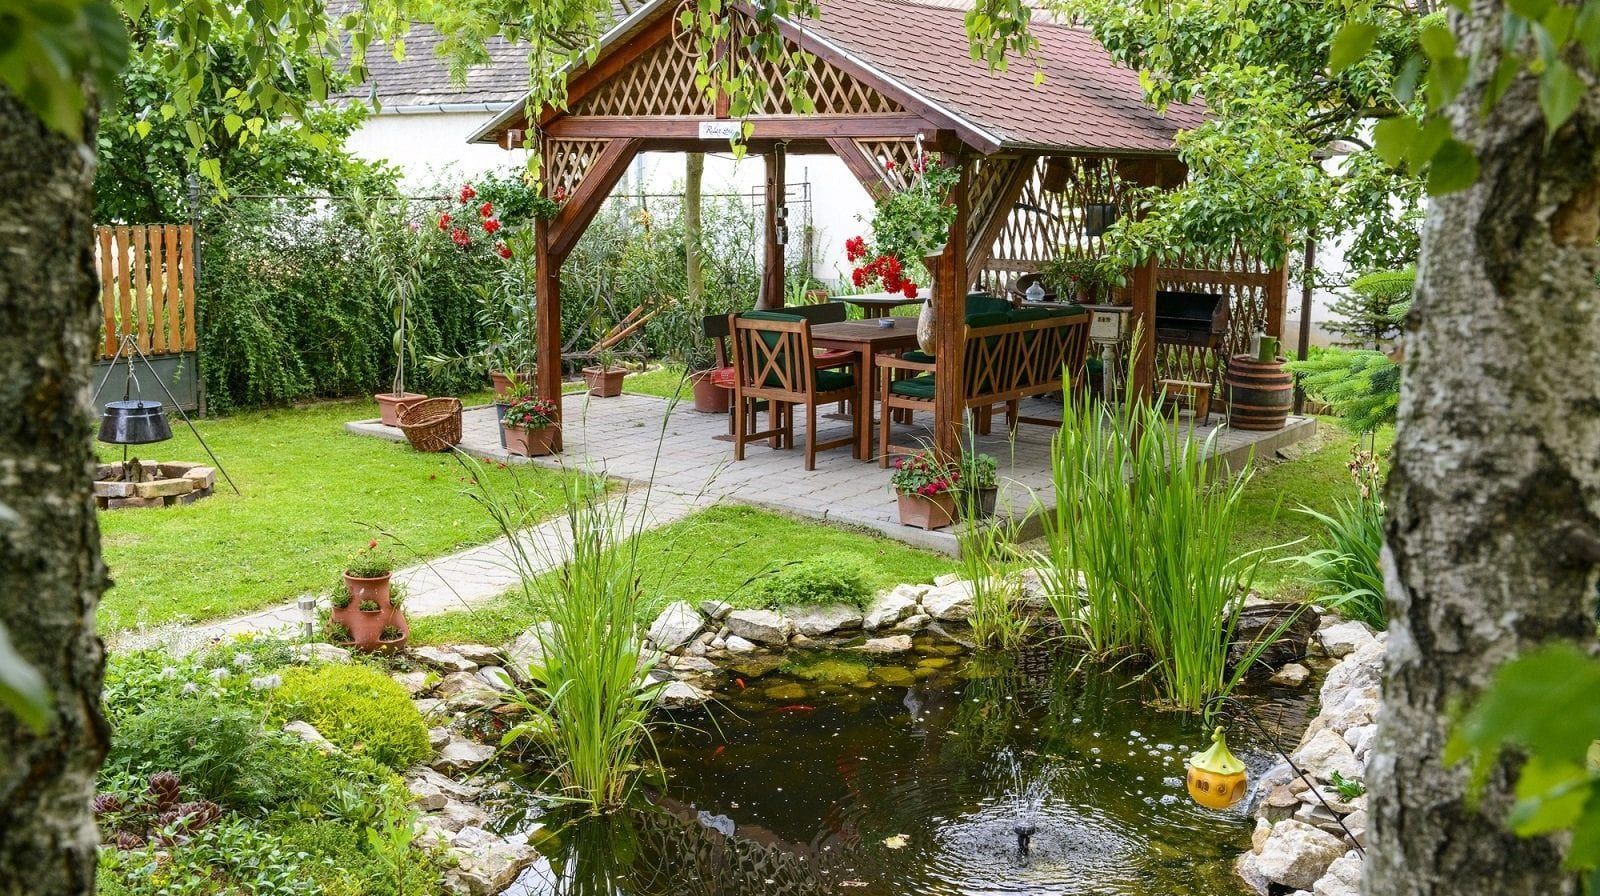
Backyard ponds are a beautiful, personalized space to enjoy the sights and sounds of nature from the comfort of your home. The scenery surrounding the pond, like plants and large stones, enhances the beauty of the landscape. However, adding a water feature like a fountain or waterfall can truly take your pond to the next level both in beauty and benefits.

Benefits of Backyard Pond Water Features

When backyard ponds don’t receive proper maintenance, they quickly become murky and uninviting. Implementing a water feature into a preexisting pond can significantly improve the overall quality of the water and the health of organisms living within it. Water features can provide a few added benefits, including:

Implementing Water Features Into an Existing Pond

Now that you’ve chosen to collect on the benefits of an added water feature in your backyard pond decide what type of feature to implement. There are a variety of water feature options available to enhance the beauty and functionality of your pond. Each style requires different installation processes, but all will leave your existing pond looking (and sounding) fresh and new.

Waterfalls

Are you the family handyman, always completing difficult odd jobs around the house? If the answer is yes, you may be capable of installing your very own backyard waterfall in an existing pond. While other water features are more easily installed, waterfalls can provide that pristine, tranquil natural atmosphere that manufactured water features lack.

Installation

Implementing a stone waterfall feature can be extremely challenging without the proper expertise. If you aren’t confident in your own abilities, don’t hesitate to contact a landscaping expert to assist in the design and installation of your newest feature.

Building a waterfall requires rocks of various sizes, stacked in such a manner so water can steadily trickle down into the pond. The dimensions of the waterfall will depend on the size of the existing pond and the grade of your backyard landscape.

To create the appearance of various levels in the waterfall, place smaller rocks or spacers between the main “spillway” rocks so the water can cascade downward. Waterfalls should be lined with durable pond liner so water can flow easily between the rock “shelves.”

Spillways

Implementing a hand-constructed waterfall can seem like a daunting undertaking. If you don’t feel like you’re up to the task, spillways are an excellent, easy to install alternative. Water flows out of the spillway in sheets, creating a peaceful babbling brook right in your backyard.

Spillways are also easily camouflaged, so if your pond is too small to support a larger stone waterfall, sneak the low-lying feature in between some small stones and plants.

Installation

Spillways are essentially a pre-made waterfall and are very easy to install. Just connect the tubing of the spillway to your existing water source and voila – you’ve already got a quasi-waterfall flowing. Disguise the top and sides of the feature to mimic naturally flowing water from the landscape.

Water Fountains

Water fountains are a classic choice of water feature in a large or small pond. They can often be found in ponds in commercial locations like office parks or upscale apartment complexes, but are also the perfect choice for a backyard pond.

Water fountains can be static and anchored in place or float around the surface of the pond. One of the top-selling points of fountains is the various shapes and heights the water can spray. Fountains are an excellent option for backyard ponds of all sizes.

Installation

Fountains are a bit more finicky to install because they require a few different contact points. First, anchor the floating device that the spout sits on to either the bottom of the pond or the bank. Then, connect the hose and pump to the water source. Finally, ensure that whatever power source fuels the fountain is the correct voltage, or there can be dangerous and expensive consequences.

Spitters

If it feels like your backyard oasis is missing that spark of personal style, consider installing a spitter or two. Spitters are a fantastic option because they come in all shapes and sizes. Shoppers often even find fun animal-shaped ceramic spitters at home goods or home improvement stores. They can add that much needed little pop of color in a serene waterscape.

Installation

Most spitters can be bought and installed straight out of the box after a thorough read-through of the instructions. Spitters include a hose and pump that connect to your existing water source. Once installed, spitters either shoot one straight stream of water or feature a pouring effect from the hidden spigot.

There is a gazebo in the middle of a garden with a pond in front of it.

Maintaining Your New Water Feature

Now that there is a beautiful new water feature installed in your backyard pond, spend time relaxing and enjoying the natural sounds of flowing water. However, don’t forget to continually maintain your pond and water feature to facilitate the highest function and longevity of your product. Run through a checklist of proper maintenance procedures regularly to keep the water feature in pristine condition.

Maintenance Checklist

Conclusion

Many backyard pond owners convince themselves that implementing water features is a difficult task. While it may be challenging to complete on your own, a professional landscape designer can help actualize your backyard vision and install the necessary products.

Any water feature, from waterfalls to spitters, can add dimension to your landscape. Choose your favorite water feature style, install, and enjoy the relaxing sounds of flowing waterways from the comfort of your backyard. 

Ready to Start on Your Next Project?

Call us at (763) 568-7251 or visit our quote page.

By Kent . October 16, 2025
Plymouth’s clay soil causes soggy lawns, sinking patios, and constant sump pump issues. Learn how smart drainage design fixes it for good.
By Kent . October 14, 2025
Minnetonka snow removal done right means safety, efficiency, and property protection—not just plowing. Learn how true winter care works.
By Kent . October 11, 2025
Plymouth drainage problems? Fix soggy clay soil and prevent foundation and patio damage with smart drain tile, grading, and discharge solutions.
By Kent . October 5, 2025
Edina lawn fertilization: seasonal strategies for lasting color and health. Expert insights on timing, topdressing, and soil care.
By Kent . October 2, 2025
Design a Minnetonka outdoor kitchen built for all seasons — cedar, stone, and smart drainage make year-round living effortless.
By Kent . October 1, 2025
Medina lawn experts explain how healthy soil—not chemicals—creates lasting weed control through aeration, overseeding, and topdressing.
By Kent . October 20, 2025
Medina drainage experts explain how French drains and drain tile systems fix clay soil water issues and prevent muddy lawns and shifting patios.
By Kent . September 29, 2025
Edina patio and pool drainage: protect your investment with smart design and precision installation that keeps surfaces beautiful, safe, and stable year-round.
By Kent . September 28, 2025
When Pergolas Don’t Last, There’s Always a Reason After nearly two decades of building outdoor spaces across Medina, I’ve seen what happens when pergolas aren’t designed for Minnesota’s conditions. You can spot them a mile away—posts that lean, beams that twist, and concrete pads that have heaved out of level after just a couple of winters. It’s not because homeowners cut corners intentionally. It’s usually because whoever built it didn’t account for what our climate really does to structures that aren’t anchored right. Medina’s heavy clay soil doesn’t drain well. It holds moisture, freezes solid, and then expands like a hydraulic press pushing on everything above it. When pergolas are set on surface-level post bases, that pressure has nowhere to go but up—and the whole thing moves. Even small shifts can cause joints to separate, wood to crack, and hardware to loosen. That’s how a $15,000 structure starts looking tired after a few years instead of standing straight for decades. The truth is, pergolas here aren’t just about shade or looks. They’re about structure, drainage, and how every piece ties into the patio beneath it. A pergola that stands tall through Minnesota winters is built on the same principles as a good foundation—it’s only as strong as what’s underneath it. If you live in Medina and want to enjoy your backyard without worrying about your investment warping or sagging, start with design that respects the environment it’s built in. That means thinking beyond lumber and stain colors. It means understanding soil movement, water management, and the importance of integrating your pergola with the patio below it.
By Kent . September 27, 2025
Solutions for Properties in Minnetonka You can always tell a Minnetonka yard that’s fighting its slope. Water doesn’t lie, it finds the weak spots every time. I’ve walked plenty of properties where a backyard starts beautiful in June, but by September, the patio is heaving, the grass near the pool looks like a marsh, and the homeowner is wondering how it got so bad so fast. The truth is, when you’re dealing with rolling terrain and heavy clay soils like we have around Minnetonka, you can’t just move dirt and hope gravity behaves. You need a plan that manages water from the surface all the way down through the subsoil. This is what I’ll walk you through here. You’ll see what actually causes drainage issues on sloped properties, how poor planning leads to cracked patios and shifting pool decks, and the smart drainage systems that can stop those problems for good. Whether you live near Lake Minnetonka or up in the higher ridges closer to Deephaven or Woodland, understanding how your yard sheds water is the difference between a property that lasts and one that’s constantly under repair. The Real Challenge of Sloped Minnetonka Yards Minnetonka is known for its hills, lakefront properties, and mature trees, but all that beauty comes with a set of challenges below the surface. Most of the soil here is dense clay. It holds water like a sponge and drains slowly, which means after every heavy rain, that water looks for a way downhill. If it doesn’t have a proper outlet, it ends up collecting right where you don’t want it, like along your patio, at the base of a retaining wall, or near your pool deck. I see this every season: homeowners trying to solve slope problems with a quick regrade, a layer of rock, or a simple surface drain. Those things might help for a while, but they don’t address what’s really happening underground. Clay soil doesn’t just get wet—it becomes saturated, expanding and contracting with every freeze-thaw cycle. When that happens under a patio or wall, it doesn’t matter how well-built the surface looks. The ground will move, and that movement cracks stone, shifts pavers, and slowly tears apart everything on top. The other challenge with sloped lots is how water interacts with gravity. It accelerates downhill, gaining momentum as it goes. When it hits a flat area like a patio, the water loses speed but not volume, pooling instead of flowing. That’s why I tell clients that “flat spots” on a sloped property are both an opportunity and a responsibility. They’re the best spaces to create usable outdoor areas, but they have to be engineered to handle water movement. I’ve worked on plenty of Minnetonka yards where the backyard has a beautiful view but terrible grading. You can have a perfect slope on paper, but if it directs water toward your house or creates a bowl effect between structures, you’ll end up with soggy soil and standing puddles that never dry. The goal is to move water off and away while keeping the surface level enough for comfort and usability. It’s a fine balance, but when it’s done right, it completely transforms how a property functions.